Thursday, November 5, 2020

Install CANON PIXMA MP237 (MP230 series) UBUNTU 20.04

Prepare the multiarch-support
  1. download the package 

    wget http://archive.ubuntu.com/ubuntu/pool/main/g/glibc/multiarch-support_2.27-3ubuntu1.2_amd64.deb


  2. install the package 
    sudo dpkg -i multiarch-support_2.27-3ubuntu1.2_amd64.deb

Prepare the libtiff4 (note: please be aware, you have to install libtiff4 not libtiff4-dev)
1. download appropriate libtiff4 from 
http://old-releases.ubuntu.com/ubuntu/pool/universe/t/tiff3/ (mine is: http://old-releases.ubuntu.com/ubuntu/pool/universe/t/tiff3/libtiff4_3.9.7-0ubuntu1_amd64.deb)

2. install the package 

sudo dpkg -i libtiff4_3.9.7-0ubuntu1_amd64.deb (replace with yours)


Prepare the libpng

1. add the repository: 
sudo add-apt-repository ppa:linuxuprising/libpng12
2. update:
sudo apt-get update
3. install the libpng12-0
sudo apt-get install libpng12-0

Install the MP237 driver
1. download driver from https://id.canon/en/support/0100469302/1?model=6220B, the file should be a tar.gz format

2. unpack the driver (replace the cnijfilter-mp230series-3.80-1-deb.tar.gz with your downloaded file)
tar -zxvf cnijfilter-mp230series-3.80-1-deb.tar.gz
3. go to the directory
cd cnijfilter-mp230series-3.80-1-deb.tar.gz
4. run the install file
sudo ./install

congratulation, your MP237 series is installing

Friday, September 11, 2020

Unusual Vlookup function of spreadsheet

 So far this function is only can be used on MS Excel and can not be applied to Google Spreadsheet which is has become my main daily tools for office activity.

As we all know, the VLOOKUP function using syntax:

VLOOKUP(LOOKUP_KEY; VLOOKUP_REFERENCE; INDEX; ISSORTED)


Usually we use VLOOKUP function as seen below:                


the cell C5 would be formula to get the price of B4 refer to table F4:G7
using formula
=VLOOKUP(B4;F4:G7;2;0)

But, how if we need to refer the value from an interval value?

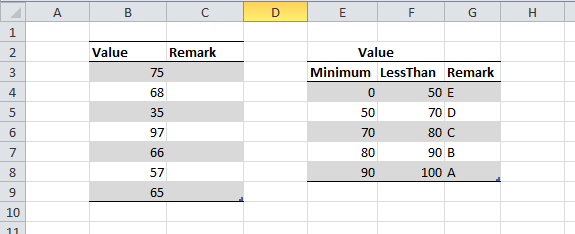
For example we need to state a stated remark based on a given value:

How to do that?

I know you will implement the nested if function such as:

=IF(AND(B3>=E4;B3<F4);G4;IF(AND(B3>=E5;B3<F5);G5;IF(AND(B3>=E6;B3<F6);G6;IF(AND(B3>=E7;B3<F7);G7;G8))))


But I proposed you a different way to get the value using VLOOKUP function below:

=VLOOKUP(B5;{0\"E";50\"D";70\"C";80\"B";90\"A"};2)

I challenge you to try this


Thursday, July 16, 2020

Ubuntu 18.04 installation stucked at update-grub 66%

1. Press ctrl-alt-F2 to enter BusyBox Shell
2.  Do this things on your BusyBox Shell, kill the process id, change 21123 with displayed process id after you do ps

# ps | grep dmsetup | grep -v grep
21123   root   29466 S    dmsetup create -r osprober-linux-sdc9

# kill 21123
3. Back to installation windows by pressing ctrl-alt-F1
Wait a moment, your installation will continue

You can read the full explanation as I found it at https://jrs-s.net/2019/05/31/ubuntu-18-04-hung-at-update-grub-66/

Tuesday, August 21, 2018

CodeIgniter: The requested URL was not found

When you use router on your web application (bramus/code igniter/etc), sometimes you found that the url redirect showing error message:

Codeigniter “The requested URL was not found” error

Bramus “The requested URL was not found” error

Router “The requested URL was not found” error

the solutions is simple, you need to modify the php settings on apache2

  1. set enable rewrite url >> sudo a2enmod rewrite
  2. set AllowOveride All on the configuration >> edit apache2.conf
  3. restart apache >> sudo systemctl restart apache2
your application run well afterthat


Monday, August 20, 2018

upgrade phpmyadmin version

sometimes the phpmyadmin stored in repository is not the updated version, so you need to upgrade manually, don't worry it so easy as you copy and paste a directory in a computer

  1. download the most updated version from https://www.phpmyadmin.net/
  2. backup the /usr/share/phpmyadmin into another directory
  3. select all files inside /usr/share/phpmyadmin and delete them
  4. extract the downloaded file into the /usr/share/phpmyadmin
that's all, and your phpmyadmin has updated, no need to restart the apache engine.

this solution is also applied and solved the phpmyadmin compatibility issue showing the error:

“Warning in ./libraries/sql.lib.php#613 count(): Parameter must be an array or an object that implements Countable”

Thursday, May 24, 2018

phpmyAdmin and MySQL Server

This happened to me, when I installed mysql-server then install phpmyadmin, I face this problem when accessing the address localhost/phpmyadmin: "mysqli_real_connect(): (HY000/1698): Access denied for user 'root'@'localhost'" and "#1698 - Access denied for user 'root'@'localhost'"

this happened because the new configuration of mysql-server and phpmyadmin, for security reason, do not allow root user to access remotely by default.

try this steps:

  1. configure the mysql-server, add a new user "pma" (phpMyAdmin) or "pmauser"
    1. login to your mysql console using terminal:
      mysql -u root -p
    2. insert your root password
    3. execute this commmand, change the 'yourpassword' to preferred one:
      Create user 'pmauser'@'%' identified by 'yourpassword';
    4. make sure that your new user had been created:
      select host, user, authentication_string from mysql.user;
    5. grant privilege to your new user, be aware that this command grants pmauser as superuser as root have: GRANT ALL PRIVILEGES ON *.* TO 'pmauser'@'%';


  2. configure the phpmyadmin config to use the created user
    1. go to /etc/phpmyadmin
      1. cd /etc/phpmyadmin
    2. edit the config-db.php file
      1. sudo gedit config-db.php
      2. edit the user (pma/pmauser) and password as we created before
      3. save the file


  3. refresh the page and login


Thursday, May 17, 2018

Totally uninstall and remove configuration MySQL Server Ubuntu 18.04

When you uninstall MySQL for any purpose and reinstall the MySQL Server, perhaps you want to fresh install for all the configuration, but you found that the configuration still remains.

Try this lists accordingly:

sudo service mysql stop  #or mysqld
sudo killall -9 mysql
sudo killall -9 mysqld
sudo apt-get remove --purge mysql-server mysql-client mysql-common

sudo deluser -f mysql
sudo rm -rf /var/lib/mysql
sudo apt-get purge mysql-server-core-5.7
sudo apt-get purge mysql-client-core-5.7
sudo rm -rf /var/log/mysql
sudo rm -rf /etc/mysql

sudo apt-get autoremove
sudo apt-get autoclean

Install MySQL Server on Ubuntu 18.04


In case we need to install mysql server on ubuntu (18.04 LTS used as case), follow the instruction
  1. Install MySQL Server
    • sudo apt-get update
    • sudo apt-get install mysql-server

    1. Allow the remote access
      • sudo ufw allow mysql

      1. Start MySQL Server
        • sudo systemctl start mysql

        1. Set MySQL to launch at reboot
          • sudo systemctl enable mysql

          1. Set MySQL password
            • sudo /usr/bin/mysql -u root -p
            • mysql> use mysql;
            • mysql> UPDATE user SET authentication_string=PASSWORD('yourpassword') WHERE User='root';
            • mysql> FLUSH PRIVILEGES;

          Tuesday, January 29, 2013

          FirewallD is not running

          Error ini akan muncul saat kita akan melakukan instalasi printer jaringan pada Ubuntu
          FirewallD is not running. Network printer detection needs services mdns, ipp, ipp-client and samba client enabled on firewall.
          Untuk menyelesaikan masalah ini, melalui Terminal ketikkan:
          sudo system-config-printer


          LibreOffice Impress Slide Pane can not re-dock

          Untuk pengguna LibreOffice Impress, ada sedikit kesulitan saat kesalahan meng-undock slide pane (panel slide: list slide), tidak dapat dikembalikan ke tempatnya semula (re-dock)

          Untuk mengembalikan slide pane ke semula, ketik ctrl-shift-F10,
          atau tekan ctrl sambil men-double-klik area kosong bagian atas slide pane

          Use ctrl-shift-F10 to re-dock your slide pane on Libre Office Impress,
          or push ctrl while you double-click the blank area above your slide list at slide pane (see mouse pointer on below image)

          Friday, June 1, 2012

          Management Asterisk VOIP PABX

          when you connect to your installed Asterisk VOIP PABX, use this connection as default:

          • user: root
          • pass: astlinux
          to add new client:
          1. goto /etc/asterisk
          2. add new client:
            1. type: vi /etc/asterisk/sip.conf
            2. to know about references about editing using vi, visit http://www.ungerhu.com/jxh/vi.html
            3. edit the sip.conf, for adding new client:
              • give new caller id as sample :
                • [123]               --> the client name
                • type=friend     --> this client can use the PABX
                • username=123
                • secret=123      --> the password
                • host=dynamic
              • save the sip.conf
          3. add new extension for PABX
            1. type: vi /etc/asterisk/extensions.conf
            2. edit the extensions.conf, follow the last exten noticed there
          to use the client:
          1. install the VoIP client
          2. add the asterisk IP address as gateway